Audio Settings
When you first open CV Toolkit, you'll need to properly set up the Audio Settings depending on your setup. In order to do that, select the Setting pane on the Sidebar.
Here's a brief description of all the settings available in the Audio Settings:
- DSP ON / OFF: turns CV Toolkit's DSP processing on /off.
- Low Performance ON / OFF: activates Low Performance mode.
- Driver: selects what audio driver to use.
- Output Device: selects the audio device (interface) which will be used for outputting CV signals to your synth.
- Input Device: selects the audio device (interface) which will be used for the Calibration process.
- Buffer Size: sets the buffer size.
- Sample Rate: sets the sample rate.
- Output Channel: sets the 8 output channels of the selected Output Device that will be used by CV Toolkit. For more information about this, check out the Output Channel section.*
- Compatibility Mode: activates special compatibility modes for special hardware devices. For more information about this, check out the Compatibility Modes section.
- Output Trim: sets the gain trim of all 8 outputs.
- SMUX: activates the SMUX encoder which is useful for using CV Toolkit at higher sample rates (> 48kHz) with the Expert Sleepers ES-3 module.
Output Channel
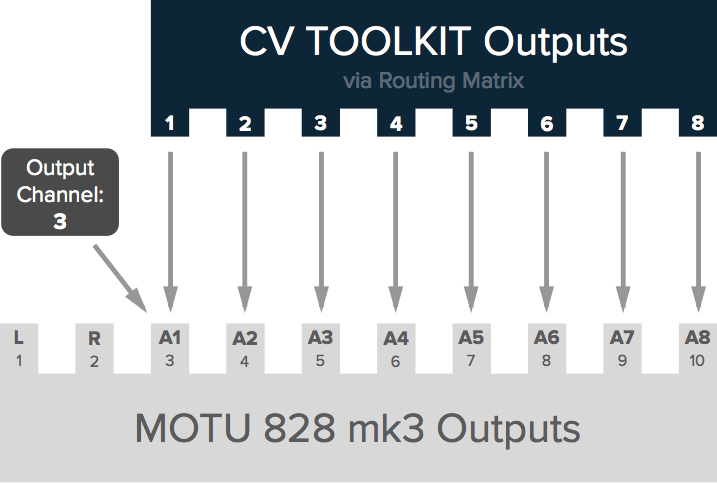
The Output Channel setting lets you align CV Toolkit's 8 outputs to 8 sequential outputs of your audio interface. In order to properly align these outputs, you should set Output Channel to the output of your audio interface that will be mapped to CV Toolkit's Out #1. CV Toolkit will automatically map the next 7 outputs accordingly.
For example, if you'd like to align CV Toolkit's 8 outputs to the 8 analog outputs of a MOTU 828 mk3 , you'd need to set Output Channel to 3.
Compatibility Modes
ES-3 / ES-8 / ES-9
Because the Expert Sleepers ES-3 / ES-8 / ES-9 modules work similarly to a standard DAC, a Compatibility Mode is not required.
To use CV Toolkit with these modules, make sure to select the appropriate Input and Output devices and set the Output Channel to the first output of the ES-3 / ES-8 / ES-9 module.
ES-5 / ES-4 / ES-40 / ESX-4CV / ESX-8CV
In order to properly set up CV Toolkit to work with the Expert Sleepers ES-5, ES-4, ES-40, ESX-4CV, and ESX-8CV modules, please follow these steps:
-
Go to the Settings pane, select your audio interface as your Output Device and set Output Channel to the first S/PDIF output channel of your interface. For example, if the S/PDIF outputs on your interface correspond to outputs 21-22, set Output to 21.
-
Using the Compatibility Mode dropdown menu, select what kind of setup you’re using: ES-3 + ES-5, ES-4 only (5 outputs), ES-4 + ESX-4CV (8 outputs), ES-40 + 2x ESX-4CV (8 outputs), or ES-40 + ESX-8CV.
-
In order to make CV Toolkit work correctly with the ES-4, you must set it to the +/- 5v mode using the jumpers on the back of the module.
-
If you’ve selected ES-4 + ESX-4CV, make sure the ESX-4CV expander is connected to the ES-4’s last header (#5).
-
If you’ve selected ES-40 + 2x ESX-4CV, make sure the ESX-4CV expanders are connected to the ES-40’s first two headers (#1 and #2).
-
If you’ve selected ES-40 + ESX-8CV, make sure the ESX-8CV expander is connected to the ES-40’s first header (#1).
-
Tips, tricks and limitations:
-
The ES-5 outputs work as follows:
-
1 - 4: Output Gate Bus channels 1-4.
-
5 & 6 : Output triggers every 1/16th notes and every bar (respectively).
-
7 & 8: Output a binary representation of the signals routed to the Routing Matrix outputs 7 and 8.
-
-
The first two channels of the ES-4 can only output positive voltages. While they may not work well for bipolar signals such as LFOs, they’re great for calibrating VCOs using since they offer a greater resolution over a shorter voltage range.
-
The ESX-4CV and ESX-8CV expander modules run at lower sample rates therefore they might not work properly with virtual modules running at audio rate such as the Morphing VCO.
Although we got success results from our tests, the support for these modules is still experimental and it might be subjected to bugs. Our plan is to improve the support for these modules in future updates.
littleBits
→ Video Tutorial - CV Toolkit 2 + littleBits USB I/O – Intro Video: https://youtu.be/_EMOdPe4bdI
CV Toolkit is compatible with the littleBits USB i/o modules. To properly set up CV Toolkit with work with these modules, follow these steps:
- Plug the USB i/o module to the computer.
- Set the USB i/o mode to IN.
- Go to the Settings panel and select the "Korg 2ch Audio Device" as your Output Device.
- Set Compatibility Mode to littleBits
- Set the Output Channel to 1.
- Set Output Trim to 100%.
- Turn on DSP.
Since the littleBits USB i/o module can only output positive signals (0-5 volts), CV Toolkit will adjust the output of some modules such as the [Clock Generator][Clock Generator] in order to improve functionality.
In order to use more than 1 USB i/o with CV Toolkit, you'll need to create an Aggregate Device and select it as your Output Device.
If you're using a Mac, you can do that via the Audio MIDI Setup app.
If you're using a Windows computer, you'll need to use a third-party solution such as ASIO4All.
Keep in mind that the littleBits USB i/o modules show up in your computer as a 2 channel audio interface (although it only uses the first one), therefore you can only use up to 4 USB i/o modules with CV Toolkit and they'll be accessible via the Routing Matrix on Outputs 1, 3, 5, and 7 (Output Layer).